
Is your WordPress hosting running out of disk space? Are you tired of paying for storage your server shouldn’t be handling in the first place? Cloudflare R2 is one of the best solutions available right now — and with OffloadX, you can offload WordPress media to Cloudflare R2 in less than 10 minutes.
In this guide, you’ll learn exactly how to offload WordPress media to Cloudflare R2, why R2 is worth choosing over Amazon S3, and how to handle your existing media library with a bulk migration.
Table of Contents
- What Is Cloudflare R2?
- Why Offload WordPress Media to Cloudflare R2?
- What You’ll Need Before Starting
- Step 1 — Create a Cloudflare R2 Bucket
- Step 2 — Generate R2 API Credentials
- Step 3 — Install OffloadX on WordPress
- Step 4 — Connect OffloadX to Cloudflare R2
- Step 5 — Configure Offload Settings
- Step 6 — Set Up a Custom Domain (Optional but Recommended)
- Step 7 — Bulk Migrate Your Existing Media Library
- Troubleshooting Common Issues
- What It Costs to Offload WordPress Media to Cloudflare R2
- After You Offload WordPress Media to Cloudflare R2
- Frequently Asked Questions
What Is Cloudflare R2?
Cloudflare R2 is an object storage service built for developers who want to offload WordPress media to Cloudflare R2 — or any cloud storage — without paying egress fees. With Amazon S3 and most other providers, you pay every time someone downloads or views a file. With R2, you only pay for storage and write operations. Bandwidth out is completely free.
R2 is S3-compatible, which means it works with any tool designed for Amazon S3, including OffloadX. You can read more in the official Cloudflare R2 documentation.
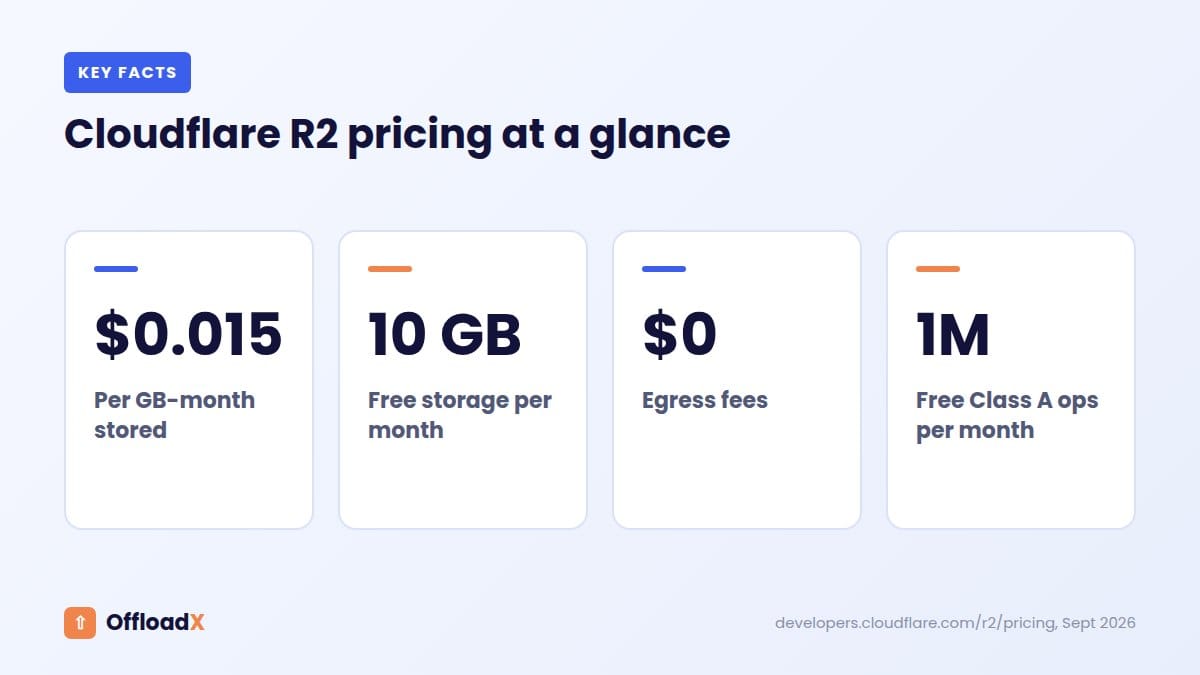
Storage pricing starts at $0.015/GB per month with a free tier of 10 GB — making it one of the most affordable options for WordPress media storage.
Why Offload WordPress Media to Cloudflare R2?
When WordPress stores media on your server, every image, video, and document counts against your hosting disk quota and gets served from a single origin. As your site grows, this creates real problems:
- Disk space fills up, forcing expensive hosting upgrades
- Your server handles all media requests, increasing load and slowing down the site
- Backups get bigger and slower with every upload
- Shared hosting throttles sites with high media traffic
When you offload WordPress media to Cloudflare R2, all of these problems disappear:
| Benefit | What It Means for Your Site |
|---|---|
| Zero egress fees | No charges for visitors loading your images |
| Free 10 GB storage | Enough to get started at zero cost |
| Global CDN | Cloudflare serves files from the nearest edge location |
| S3-compatible API | Works with all standard tools including OffloadX |
| DDoS protection built in | Your media is behind Cloudflare’s network |
| Reduced server load | Your hosting only handles PHP, not media delivery |
For most WordPress sites, switching media to R2 cuts hosting costs and meaningfully improves page load speed — especially for image-heavy pages.
What You’ll Need Before Starting
- A Cloudflare account (free tier works — sign up at cloudflare.com)
- A WordPress site with admin access
- OffloadX installed (the free plan covers Steps 1–6 for up to 100 files; bulk migration in Step 7 needs a paid plan)
- About 10 minutes
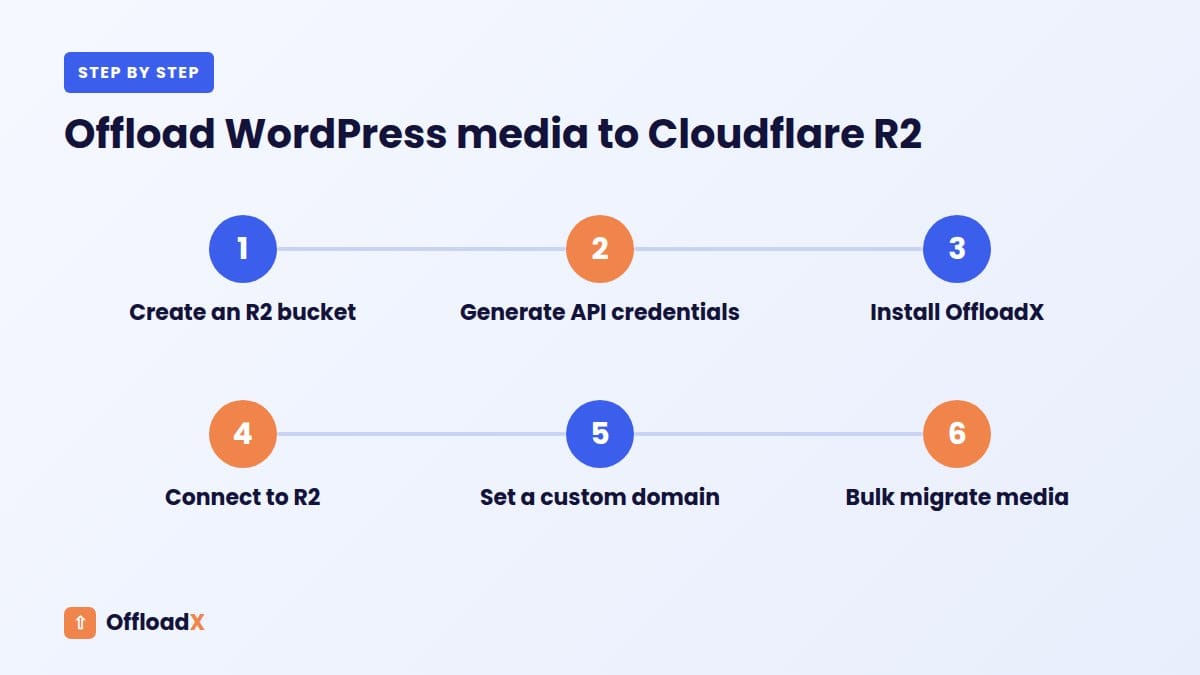
Step 1 — Create a Cloudflare R2 Bucket
- Log in to your Cloudflare Dashboard at dash.cloudflare.com
- In the left sidebar, click R2 Object Storage (under Storage & Databases)
- Click Create bucket
- Enter a bucket name — something like
your-site-media. Keep it lowercase with hyphens, no spaces - For Location, choose Automatic unless you have a specific region requirement
- Click Create bucket
Your bucket is now ready. Keep this tab open — you’ll need the bucket name in Step 4.
Tip: Bucket names are permanent. Choose something descriptive that ties to your site, not a generic name like “wordpress-files”.
Step 2 — Generate R2 API Credentials
OffloadX needs an Access Key and Secret Key to connect to your bucket. Here’s how to create them:
- In the Cloudflare Dashboard, click R2 Object Storage in the sidebar
- Click the Manage R2 API Tokens link (top right of the R2 overview page)
- Click Create API Token
- Give the token a name — e.g.
offloadx-wordpress - Under Permissions, select Object Read & Write
- Under Specify bucket(s), choose the bucket you created in Step 1
- Click Create API Token
Cloudflare will show you:
- Access Key ID
- Secret Access Key
- Endpoint URL (looks like
https://ACCOUNT_ID.r2.cloudflarestorage.com)
Copy these now — the Secret Access Key is only shown once. Paste them somewhere safe before closing this page.
You’ll also need your Account ID, which you can find in the Cloudflare Dashboard right sidebar on any page.
Step 3 — Install OffloadX on WordPress
To offload WordPress media to Cloudflare R2, you’ll use OffloadX — the plugin that handles the connection, URL rewriting, and bulk migration automatically.
- Download OffloadX from offloadx.com
- In your WordPress admin, go to Plugins → Add New Plugin → Upload Plugin
- Choose the downloaded
.zipfile, click Install Now, then Activate
Once activated, you’ll see OffloadX appear in your WordPress admin sidebar.
Step 4 — Connect OffloadX to Cloudflare R2
- In your WordPress admin, click OffloadX in the sidebar
- On the Storage Provider screen, select Cloudflare R2
- Enter the credentials you copied in Step 2:
- Account ID — your Cloudflare account ID
- Access Key ID — from the API token
- Secret Access Key — from the API token
- Click Verify Credentials
OffloadX will test the connection and confirm it’s working. If you see a green checkmark, you’re connected.
- From the bucket dropdown, select the bucket you created in Step 1
- Click Save Settings
Troubleshooting: If verification fails, double-check that your API token has Object Read & Write permissions on the correct bucket. Also confirm you copied the endpoint URL and account ID correctly — these are easy to mix up.
Step 5 — Configure Offload Settings
Once connected, you have a few key settings to configure:
Auto-Offload New Uploads
Enable this. Every new image or file uploaded to your media library will automatically be sent to R2 and served from there. This is the core behaviour you want.
Remove Local Copy After Upload
When enabled, OffloadX deletes the file from your server after uploading to R2, freeing disk space immediately. Recommended if your main goal is to reduce hosting storage. Leave it disabled if you want to keep a local backup.
Rewrite URLs
Always enable this. It replaces the URLs of your media files in post content, pages, and widgets — pointing them to R2 instead of your server. Without this, your images still load from your server even after you offload WordPress media to Cloudflare R2.
Custom CDN URL (Optional)
If you set up a custom domain on your R2 bucket (covered in Step 6), enter it here. Your media will be served from your domain instead of the default R2 storage URL.
Step 6 — Set Up a Custom Domain for R2 (Recommended)
Recommended for live sites: Cloudflare rate-limits the r2.dev address and recommends it for development only. Our full guide to serving WordPress media from a custom R2 domain also covers cache rules and CORS.
By default, your R2 files are served from a URL like:
https://pub-xxxx.r2.dev/your-file.jpg
You can instead serve them from your own subdomain, like:
https://cdn.yoursite.com/your-file.jpg
This looks more professional, improves SEO, and gives you more control over your media delivery.
- In the Cloudflare Dashboard, go to R2 → Your Bucket → Settings
- Scroll to Custom Domains and click Connect Domain
- Enter a subdomain like
cdn.yoursite.com(your domain must be on Cloudflare) - Click Connect — Cloudflare creates the DNS record and SSL automatically
- Back in OffloadX under Settings → Custom CDN URL, enter
https://cdn.yoursite.com - Save settings
Step 7 — Bulk Migrate Your Existing Media Library
New uploads are handled automatically, but what about the thousands of images already on your server? OffloadX includes a Bulk Migrator to handle this. This is the final step to fully offload WordPress media to Cloudflare R2 — including your existing files.
- In OffloadX, go to the Bulk Migration tab
- Click Start Migration
- OffloadX scans your media library, uploads files to R2, rewrites URLs in your database, and optionally deletes local copies
For large libraries, the migration runs in batches to avoid server timeouts. It picks up where it left off if interrupted.
Before running bulk migration: Take a full site backup. While OffloadX includes a URL revert feature, it’s good practice to back up your database first.
Troubleshooting Common Issues
For the full list of error messages and fixes, see Cloudflare R2 WordPress errors and how to fix them.
Files aren’t showing after migration
Check that Rewrite URLs is enabled. Also verify the bucket has public read access if you’re not using signed URLs.
SignatureDoesNotMatch error
The Secret Access Key was likely copied with a trailing space. Delete the token in Cloudflare, create a fresh one, and re-enter it in OffloadX.
Images serving from old URLs
Flush your cache in WP Rocket, LiteSpeed, W3 Total Cache, or whichever caching plugin you use.
403 Forbidden on media files
Your R2 bucket may have public access disabled. Enable Allow public access in bucket settings, or use OffloadX’s pre-signed URL feature.
Custom domain not resolving
Make sure your domain is on Cloudflare with proxied DNS — not just pointed to Cloudflare nameservers externally.
What It Costs to Offload WordPress Media to Cloudflare R2
Cloudflare R2 pricing is simple, which is a big part of why so many site owners choose it. According to Cloudflare’s R2 pricing page, Standard storage costs $0.015 per GB-month, the first 10 GB each month are free, and there are no egress fees for data served to the internet.
Operations are billed separately, but the free tier is generous: 1 million Class A operations (writes and lists) and 10 million Class B operations (reads) per month. Most small and medium WordPress sites never leave the free allowance for operations.
| Media library size | Monthly storage cost on R2 | Egress cost |
|---|---|---|
| 10 GB | $0.00 (free tier) | $0 |
| 50 GB | $0.60 | $0 |
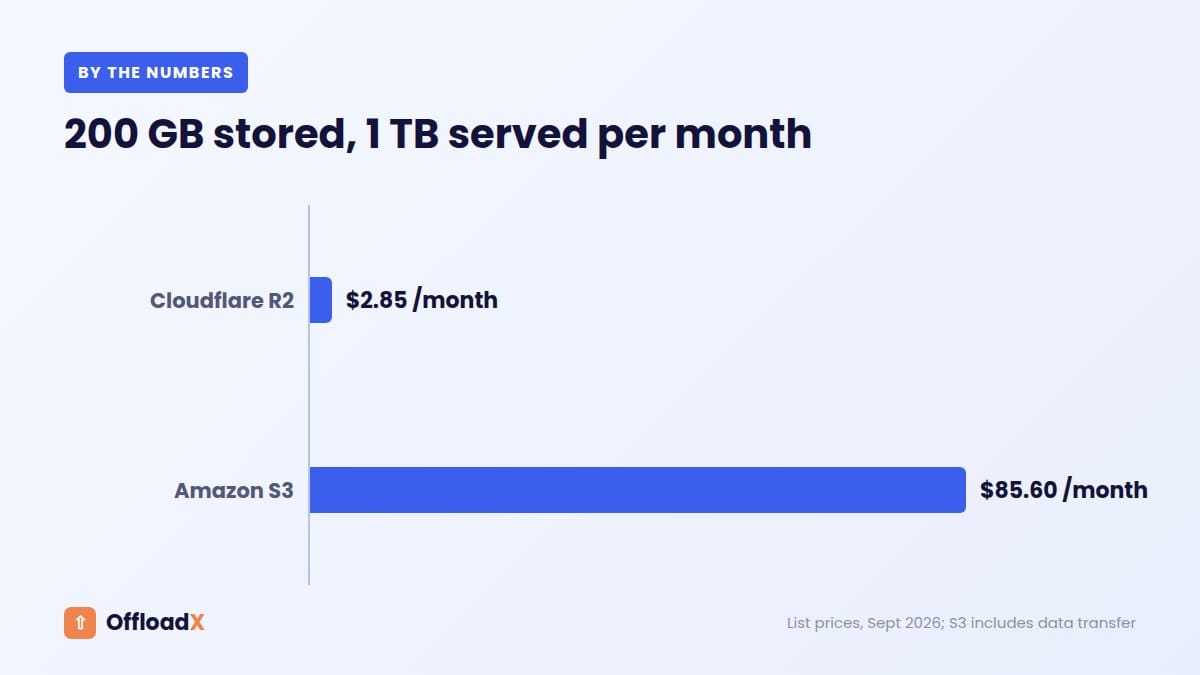
| 200 GB | $2.85 | $0 |
| 1 TB | $14.85 | $0 |
The last column is the important one. With Amazon S3, a site serving 1 TB of images a month pays roughly $81 in data transfer on top of storage. When you offload WordPress media to Cloudflare R2, that line disappears. See our full Cloudflare R2 vs Amazon S3 comparison for more examples.
Why the free egress matters for WordPress
WordPress sites are image-heavy. The HTTP Archive Web Almanac 2025 found that images make up about 42% of the median mobile page’s weight. Every visitor downloads those bytes, so bandwidth grows with traffic, not with how many files you store. Free egress means a viral post does not turn into a surprise bill.
After You Offload WordPress Media to Cloudflare R2
Once the migration is finished, a few extra steps keep the setup fast and safe over the long term.
Serve media from your own subdomain
The r2.dev address is useful for testing, but Cloudflare describes it as rate-limited and not meant for production traffic. Connect a custom domain such as media.yoursite.com in the bucket settings, so files are cached on Cloudflare’s network and your image URLs stay the same if you ever change provider. Our R2 custom domain guide walks through it.
Keep your keys safe
- Scope the API token to one bucket with object read and write permissions only.
- Never paste keys into support chats, forums or code repositories.
- Rotate the token if you think it has been exposed, then update the plugin.
Check the site as a visitor
Open your homepage, a recent post and an old post in a private window. Right-click a few images and open them in a new tab to confirm they load from your R2 domain. Test on a phone too, because mobile screens load different thumbnail sizes through srcset.
Free up disk space
When everything loads correctly for a week or two, you can remove local copies of offloaded files. This is where the real disk space saving happens, and it also makes backups much smaller. If disk space was your main reason for moving, our guide to a WordPress site running out of disk space covers other quick wins.
Measure the speed difference
Run PageSpeed Insights on the same pages before and after. With media on a Cloudflare custom domain, visitors far from your server usually see the biggest improvement. Our guide to offloading WordPress media for speed explains how to protect your Largest Contentful Paint image after the move.
How long does it take to offload WordPress media to Cloudflare R2?
Setting up the bucket, token and plugin usually takes 15 to 30 minutes. Moving an existing library depends on its size and your host’s upload speed: small sites finish in minutes, while libraries with tens of thousands of files can take a few hours. OffloadX’s Bulk Migration on paid plans runs in the background, so you can keep working while it finishes.
What if something goes wrong?
Keep local copies until you have tested the site. If images fail to load, the usual causes are a bucket without public access, a custom domain that is not active yet, or old URLs cached by a page cache plugin. Our guide to Cloudflare R2 WordPress errors lists the common messages and fixes.
Is Cloudflare R2 a good fit for WooCommerce?
Yes for product images, which should be public and fast. Paid downloads should stay private. Our Cloudflare R2 for WooCommerce guide explains which files to move and which to keep on your server.
Once your media is on R2, new uploads go there automatically, so the setup keeps working without any extra effort as your library grows.
Quick checklist: custom domain connected, token scoped to one bucket, images tested logged out and on mobile, local copies removed only after a week of clean results.
Frequently Asked Questions
Is Cloudflare R2 free?
R2 includes a free tier of 10 GB storage, 1 million Class A operations (writes), and 10 million Class B operations (reads) per month. Most small-to-medium WordPress sites stay within the free tier for a long time.
Will my existing images break when I offload WordPress media to Cloudflare R2?
No. OffloadX rewrites all URLs in your database as part of the migration. Visitors won’t notice anything — the same images load, just from R2 instead of your server.
Can I revert back to serving from my server?
Yes. OffloadX includes a Revert feature that rewrites all URLs back to local paths. If you kept local copies, your files are still on the server and serve immediately.
Does this affect my SEO?
Using a custom subdomain keeps all assets on your domain — the best setup for SEO. The default r2.dev URL is generally fine but a custom domain is cleaner.
Does OffloadX support multiple WordPress sites?
Yes. The Business and Agency plans cover multiple sites under a single licence — ideal if you manage client sites.
What happens to WooCommerce product images?
WooCommerce product, gallery and variation images are offloaded on the OffloadX Business and Agency plans, and served from R2 like any other media. See our guide to Cloudflare R2 for WooCommerce, including a cost comparison with Amazon S3.
Related Cloudflare R2 Guides
- Best Cloudflare R2 WordPress plugins (2026 comparison)
- How to migrate from WP Offload Media to Cloudflare R2
- Cloudflare R2 for WooCommerce product images
- Serve WordPress media from a custom R2 domain
- Cloudflare R2 WordPress errors and fixes
Related Guides
More From the Blog
Conclusion
If you’ve been looking for a way to offload WordPress media to Cloudflare R2, OffloadX makes it straightforward — zero egress fees, a generous free tier, and Cloudflare’s global network serving your files in under 10 minutes.
Once configured, media offloading runs silently in the background. Your server handles WordPress. Cloudflare handles your files.
Download OffloadX Free →Have questions about this setup? Leave a comment below or reach out via our support page.