
An Elementor media offload needs more care than offloading a site built only with the block editor. Elementor saves image URLs inside its own JSON data and then writes many of them into generated CSS files, so a plugin that rewrites normal WordPress image URLs may not reach every image on an Elementor page.
This guide explains where Elementor keeps image URLs, why that matters when you move media to Cloudflare R2, Amazon S3 or another bucket, and how to use Elementor’s own Regenerate and Replace URL tools. You will also find a safe step-by-step process, WP-CLI commands, short notes for Beaver Builder and Divi, and a testing checklist to run before you delete a single local file.
Table of Contents
- How Elementor Stores Image URLs
- Elementor’s Generated CSS Files
- Why This Matters for Elementor Media Offload
- Elementor’s Regenerate and Replace URL Tools
- Safe Elementor Media Offload, Step by Step
- WP-CLI Commands for Elementor Sites
- Notes for Other Page Builders
- Testing Checklist
- Troubleshooting Missing Images
- Frequently Asked Questions
How Elementor Stores Image URLs
A page built with the block editor keeps its content, including image tags, in the post_content column of the posts table. Elementor works differently. According to Elementor’s data structure documentation, it stores the page layout and settings as JSON in post metadata, which is a private custom field that is not visible in the WordPress dashboard.
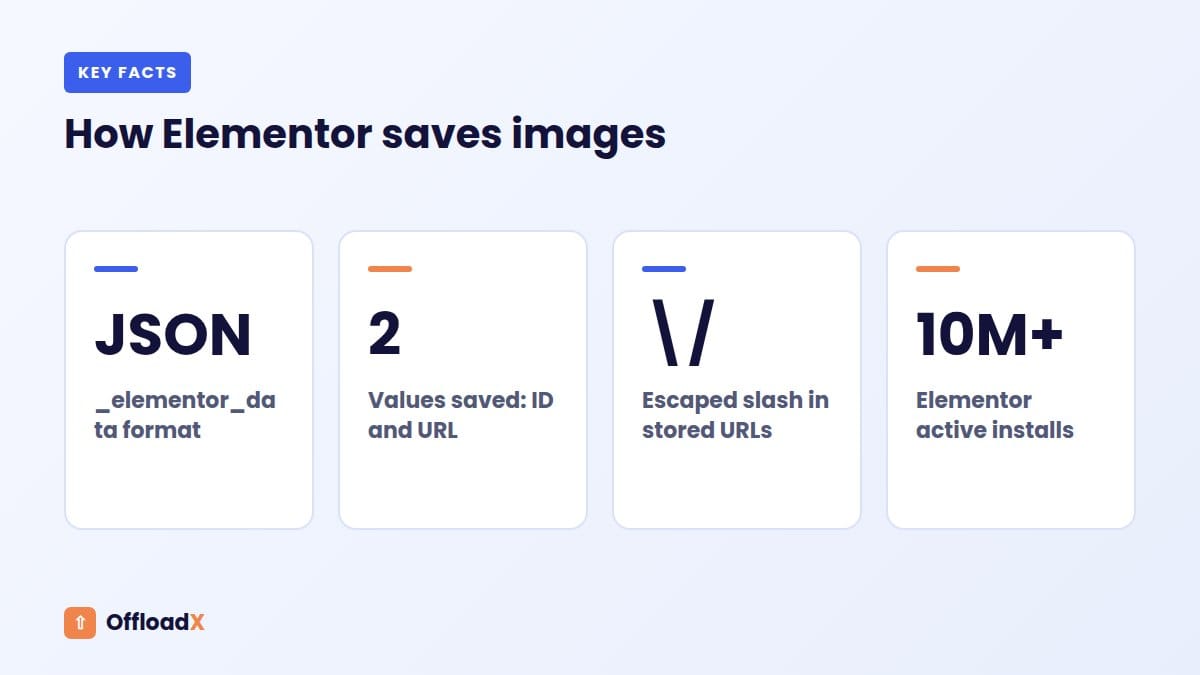
That custom field is _elementor_data, saved in the wp_postmeta table. Every section, container, column and widget on the page, with all of its settings, lives inside that JSON.
What an image looks like in the data
Elementor’s Media control documentation says the control returns an array with two values: the attachment id and the media url. So when you pick an image in an Image widget or set a background image, Elementor saves both the ID and the full file URL.
| Where the image is used | Where the URL is saved | Format |
|---|---|---|
| Image, gallery and carousel widgets | _elementor_data | JSON, with ID and URL |
| Section, container and column backgrounds | _elementor_data | JSON, with ID and URL |
| Page-level settings (for example a page background) | _elementor_page_settings | Stored separately from the layout |
| Text Editor and HTML widgets | Inside the widget’s HTML in _elementor_data | Plain URL inside HTML markup |
| Generated styles | CSS files in uploads/elementor/css/ | Plain url() values |
Escaped slashes in the JSON
JSON often stores forward slashes escaped with a backslash, so a URL can appear in the database as https:\/\/example.com\/wp-content\/uploads\/.... Elementor’s own URL replacement code accounts for this: a GitHub issue about the Replace URL tool shows the query converting / to \/ before searching.
This detail matters. A database search for the plain URL https://example.com/wp-content/uploads may miss every image stored in escaped form, and a search-and-replace that only looks for the plain form will leave those Elementor images untouched.
Key point: Elementor saves the full image URL, not only the attachment ID. Any Elementor media offload plan has to deal with URLs stored inside _elementor_data, often with escaped slashes.Elementor’s Generated CSS Files
Elementor does not build every style on each page load. Its flush-css CLI documentation explains that styles set in Elementor are saved in the database and used to generate CSS files in /wp-content/uploads/elementor/css/.
Background images are part of those styles. When you set a background image on a container, the URL from _elementor_data ends up as a background-image: url(...) rule in a generated CSS file. The browser then requests the image from whatever URL the CSS file contains.
Why generated CSS is easy to miss
- The CSS file is a static file on disk, created at an earlier time, so it keeps whatever URL was saved when it was generated.
- Many offload plugins change URLs as WordPress outputs page HTML. A static CSS file loaded separately by the browser is not part of that HTML.
- The file sits inside the uploads folder, so an offload plugin may or may not treat it as media. Check what yours does.
- Elementor also has a CSS print method setting with “External File” and “Internal Embedding” options. With internal embedding, styles are printed into the page instead of a separate file, which changes where URLs appear.
The good news is that these files can be rebuilt at any time from the database. Once the saved URLs are correct, regenerating the CSS produces files that point at your bucket or media domain.
Why This Matters for Elementor Media Offload
Offloading copies your media to a bucket and makes WordPress serve it from there. For standard WordPress images, an offload plugin can filter the URLs WordPress generates for attachments. OffloadX, for example, rewrites URLs instantly on every plan. Elementor images are different because some of their URLs come straight from saved JSON or a CSS file rather than from a fresh WordPress lookup.
What can go wrong
| Problem | Cause | When you notice it |
|---|---|---|
| Background images disappear | Generated CSS still points at local files that were removed | After local copies are deleted |
| Some images load from the bucket, others from the server | Only part of the stored URLs were rewritten | In the browser’s Network panel |
| Images in Text Editor widgets break | Hard-coded URLs in HTML inside the widget | After local copies are deleted |
| Old URLs come back after editing | The editor re-saves the stored URL, not the rewritten one | After saving a page |
| Page looks fine while logged in, broken for visitors | Page cache or CDN still serves an old version | In a private window |
None of these problems appear while local copies still exist. The server keeps answering requests for local URLs, so the site looks perfect. They only appear once local files are removed to save disk space, which is often the whole reason for offloading. If that is your goal, our guide to a WordPress site running out of disk space explains the wider picture.
Two ways to handle stored URLs
- Keep local copies and rely on output rewriting. Safer, but you do not save disk space, and CSS files may still load images from your server rather than the bucket.
- Update the stored URLs, then regenerate CSS. Every saved URL points at the bucket or media domain, the CSS files are rebuilt to match, and local copies can be removed after testing.
For most sites, option two is the goal of an Elementor media offload, with option one as a safe waiting state while you test.
Elementor’s Regenerate and Replace URL Tools
Elementor includes two admin tools that do most of the work. Both are found under Elementor → Tools in the WordPress dashboard. Labels have changed between Elementor versions, so the exact button text on your site may differ slightly from what is described here.
Regenerate CSS and data
On the General tab of Elementor → Tools, there is a button that deletes Elementor’s generated files and data so they are rebuilt. Elementor’s site migration guide refers to it as “Regenerate Files”. Older versions labelled it “Regenerate CSS & Data”, and Elementor’s current help article is titled “Clear Files & Data”.
- It removes the generated CSS so Elementor recreates it from the database.
- It does not change any URLs stored in
_elementor_data. It only rebuilds files from what is saved. - Run it after any change to stored URLs, and after changing Elementor settings that affect styles.
Replace URL
The Replace URL tab of Elementor → Tools is built for domain changes. Elementor’s migration guide says to enter the old URL in the left box and the new URL in the right box, then click Replace URL. The tool updates URLs saved in Elementor’s data, handling the escaped-slash format for you.
For an offload, the “old” value is your local uploads URL and the “new” value is your bucket or media domain URL, for example:
- Old:
https://example.com/wp-content/uploads - New:
https://media.example.com/wp-content/uploads
The new value must match the path structure your offload plugin uses in the bucket. Check a real offloaded file’s URL first and copy its prefix exactly.
Known limits reported by users
- Full URLs only: a GitHub report filed against Elementor 3.6.5 notes that the tool rejects scheme-relative URLs such as
//example.com. Use fullhttps://URLs. - JSON rows only: the issue linked earlier shows the tool targeting
_elementor_datarows stored as JSON. Older data in other formats, such as serialized_elementor_page_settings, may be skipped. - Background and slider images: a separate report on Elementor 3.6.6 and Pro 3.7.2 says the tool returned “0 results” for some background and slider images. Your version may behave differently, so verify rather than assume.
Key point: Replace URL changes what is saved; Regenerate rebuilds files from what is saved. Run Replace URL first, then Regenerate, then test.
Safe Elementor Media Offload, Step by Step
This order keeps the site working at every stage of an Elementor media offload. Nothing is deleted until you have proved the new URLs load.
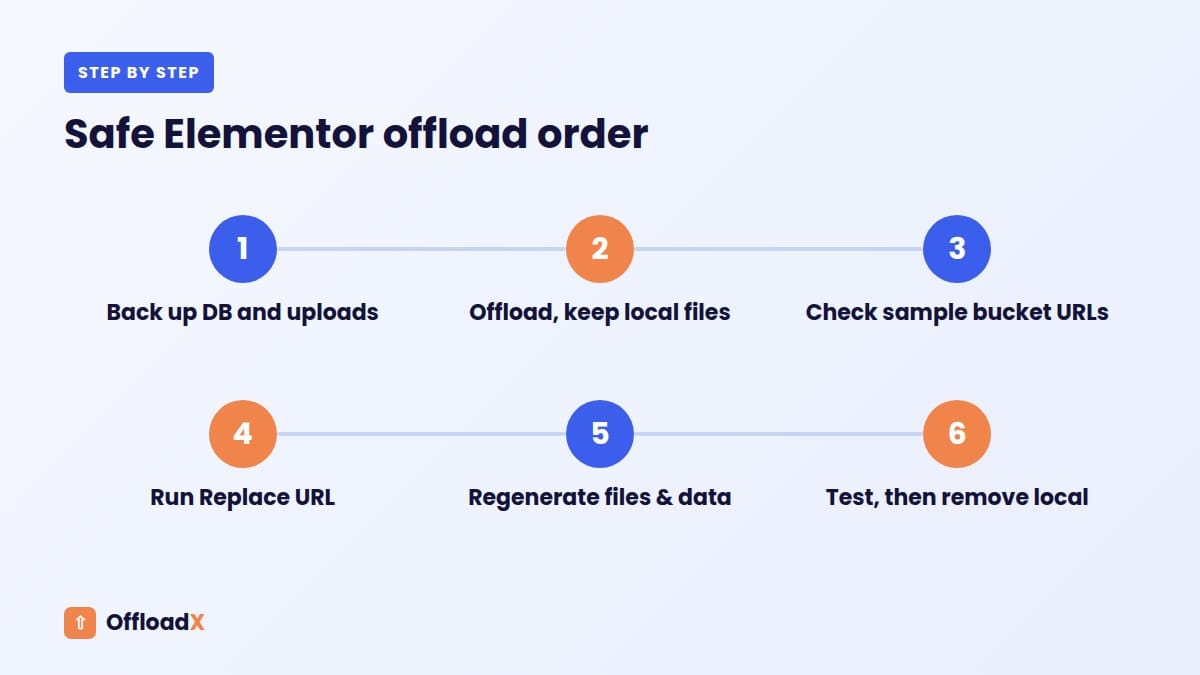
Step 1: Back up the database and uploads
Take a full backup, including the database and the wp-content/uploads folder, and store it off the server. Replace URL writes directly to the database and cannot be undone from the Elementor screen.
Step 2: Try it on staging first
If your host offers a staging copy, do the whole process there. Elementor sites vary a lot in how images are added, and staging lets you find surprises safely.
Step 3: Offload with local copies kept
Connect your bucket and offload the existing library while keeping local files. Our guides to offloading WordPress media to Cloudflare R2 and offloading to Amazon S3 cover the connection side. In OffloadX, the Bulk Migration screen (Starter and above) handles existing files.
Step 4: Confirm a sample of offloaded URLs
Open five or six offloaded images directly in the browser using their bucket or media domain URL. If any return an error, fix delivery settings before touching the database. A custom domain for Cloudflare R2 gives you a stable, readable prefix to use in the next step.
Step 5: Update stored URLs
Use Elementor → Tools → Replace URL with your local uploads prefix as the old value and your bucket prefix as the new value. If your offload plugin has a database URL replacer, such as OffloadX’s URL Replace screen on Starter and above, use it for normal post content too, and check whether it covers Elementor’s escaped JSON on your site before relying on it alone.
Step 6: Regenerate Elementor files
Click the Regenerate (or Clear) Files & Data button on Elementor → Tools → General. Then clear your page cache and any CDN cache.
Step 7: Test with local copies still in place
Run the testing checklist below. Watch the Network panel: every image and background should now load from the bucket or media domain, even though local files still exist.
Step 8: Remove local copies, then test again
Only when every request goes to the bucket should you remove local copies. Test again straight after, in a private window, and keep the backup for a few weeks.
WP-CLI Commands for Elementor Sites
If you have SSH access, Elementor’s WP-CLI commands make an Elementor media offload faster and are easy to repeat on staging and live sites.
| Command | What it does |
|---|---|
wp elementor replace-urls <old> <new> | Replaces URLs in Elementor data; add --force to suppress error messages |
wp elementor flush-css | Deletes generated CSS; Elementor rebuilds it on the next page load |
wp elementor flush-css --regenerate | Deletes and immediately rebuilds CSS files |
wp elementor flush-css --network | Flushes CSS on every site in a multisite network |
These come from Elementor’s replace-urls and flush-css developer documentation.
Checking what is left with search-replace
WordPress’s own wp search-replace command supports --dry-run, which reports how many matches exist without changing anything. That makes it a good audit tool after Replace URL:
wp search-replace 'https://example.com/wp-content/uploads' 'X' --dry-runfinds plain URLs, such as those in post content and Text Editor widgets.wp search-replace 'https:\/\/example.com\/wp-content\/uploads' 'X' --dry-runfinds escaped URLs in JSON. Shell quoting of backslashes varies, so test the pattern on one known match first.
If either dry run still shows matches in wp_postmeta after using Elementor’s tool, those rows need attention before local files are removed.
Notes for Other Page Builders
Other builders have the same basic issue: stored URLs plus cached CSS. The details below come from each builder’s documentation or a well-known guide.
| Builder | Generated files | How to rebuild them |
|---|---|---|
| Elementor | wp-content/uploads/elementor/css/ | Elementor → Tools → Regenerate / Clear Files & Data, or wp elementor flush-css |
| Beaver Builder | wp-content/uploads/bb-plugin/cache | Settings → Beaver Builder → Tools → Clear Cache |
| Divi | wp-content/et-cache/ | Divi → Theme Options → Builder → Advanced → Static CSS File Generation → Clear |
Beaver Builder
Beaver Builder’s cache documentation says it generates CSS and JavaScript files and stores them in wp-content/uploads/bb-plugin/cache. It also says the cache refreshes automatically when posts are updated, when the plugin is updated, or when site URLs change during migration. Clear it manually after an offload anyway.
Divi
A guide from Divi Booster shows the static CSS cache being cleared from Divi → Theme Options → Builder → Advanced, or by emptying wp-content/et-cache/. Note that this folder sits outside uploads.
Block editor
The block editor saves image markup, including the URL, in post_content. That is the case most offload plugins and database URL replacers are designed for, so block editor sites are usually the simplest to offload.
Testing Checklist
Run this list twice during any Elementor media offload: once after regenerating CSS with local copies still in place, and again after removing local copies. Use a private window and clear all caches first.
Pages to test
- The home page and any landing pages built with Elementor.
- A page with section or container background images.
- A page with a gallery, carousel or slider.
- A page with images in a Text Editor or HTML widget.
- Your header, footer and any popups or theme builder templates.
- An archive page and a single post template, if you use Elementor’s theme builder.
- Mobile and tablet views, since responsive background images can use different settings.
What to check
- In the browser’s Network panel, filter by images: every request should go to the bucket or media domain.
- Open one generated CSS file from
uploads/elementor/css/and search it forurl(to confirm the new prefix. - No 404 errors or mixed content warnings in the console.
- Open one page in the Elementor editor, save it without changes, and check the images still load from the bucket.
- Upload a new image in the editor, place it, publish, and confirm it is offloaded.
If your site also needs to feel faster after the move, our guide on offloading WordPress media for speed covers caching and CDN settings.
Troubleshooting Missing Images
Background images are missing but normal images load
The generated CSS still has old URLs. Run Replace URL, then regenerate files, then clear page and CDN caches. If the problem stays, search _elementor_data for the escaped old URL to see what was missed.
Replace URL says 0 rows affected
Check the old value exactly matches what is stored, including https versus http and www. Use full URLs, not scheme-relative ones. If some images were added from an older version, check _elementor_page_settings as well.
Images break only for logged-out visitors
A page cache or CDN is serving an old copy. Purge all caches. OffloadX’s Cache Tools screen (Pro and above) includes cache purge tools.
Bucket URLs return access denied
The problem is on the storage side, not in Elementor. Check public access or the custom domain setup. Our list of Cloudflare R2 WordPress errors covers the common causes.
Images in a Text Editor widget still point to the server
These are plain URLs inside HTML. Check with a wp search-replace dry run for the plain old URL and update them, or edit the widget by hand if there are only a few.
Regenerating files fails or the admin screen times out
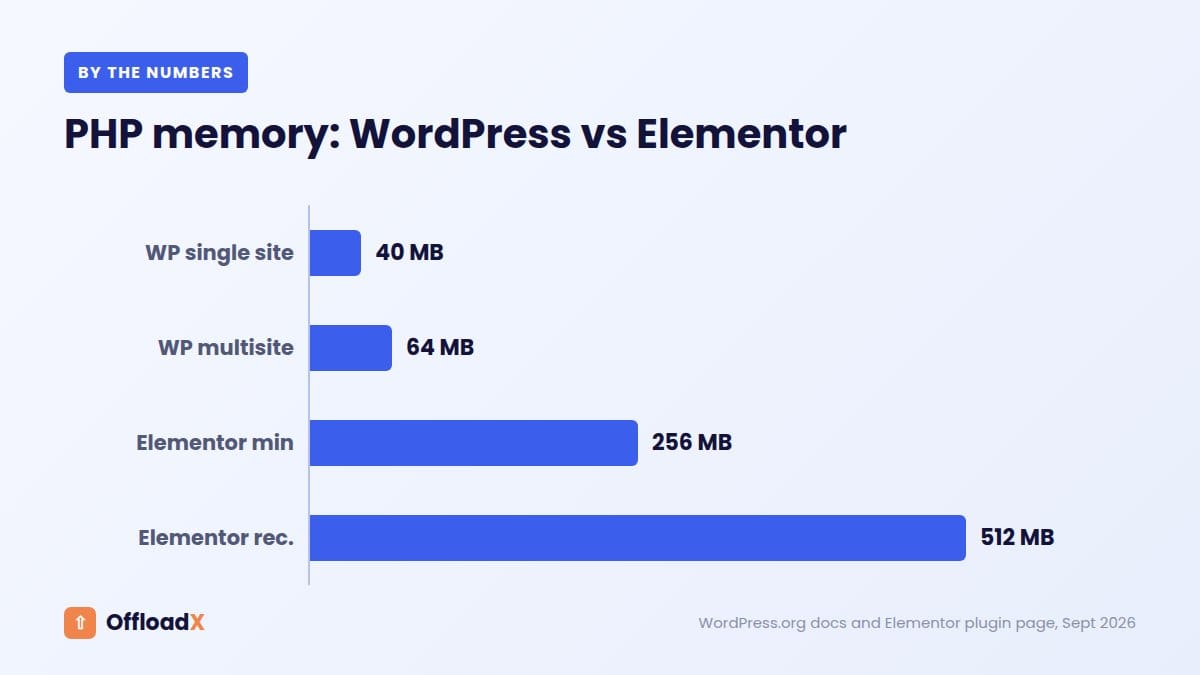
Large sites can run short of PHP memory while Elementor rebuilds data. Elementor’s WordPress.org page lists a 256 MB memory minimum with 512 MB or more recommended, while WordPress’s own default WP_MEMORY_LIMIT is 40 MB on a single site and 64 MB on multisite, according to the wp-config.php documentation. Raise the limit, or use wp elementor flush-css --regenerate over SSH, where timeouts are less of a problem.
Frequently Asked Questions
Does Elementor store image URLs or attachment IDs?
Both. Elementor’s Media control saves an array with the attachment ID and the full URL, inside the _elementor_data JSON for the page.
Where does Elementor keep its generated CSS?
In /wp-content/uploads/elementor/css/, according to Elementor’s developer documentation. The files are generated from settings saved in the database.
Do I need to run Replace URL for an Elementor media offload?
If you plan to remove local copies, yes, or use another method that updates Elementor’s stored URLs. If you keep local copies, images still load, but some may come from your server instead of the bucket.
Will regenerating CSS fix broken backgrounds on its own?
Only if the stored URLs are already correct. Regenerating rebuilds CSS from what is saved, so update the URLs first.
Can I use a normal search-and-replace plugin instead?
You can, as long as it searches for the escaped form of the URL used in JSON as well as the plain form. Elementor’s own tool handles the escaping for you, so start there and audit afterwards.
Is it safe to delete the uploads/elementor/css folder?
Elementor can regenerate those files from the database, and its flush-css command deletes them by design. Still, use the built-in tool or command rather than deleting by hand, and back up first.
Does this apply to Elementor Pro?
Yes. Pro adds widgets, popups and theme builder templates, but they use the same data storage, so include them in your testing.
Conclusion
A successful Elementor media offload comes down to one idea: fix the URLs Elementor has saved, then rebuild the files generated from them. Back up, offload with local copies kept, run Replace URL and Regenerate, test every page type, and only then remove local files.
See OffloadX Plans →Sources: Elementor developer documentation (data structure, Media control, WP-CLI replace-urls and flush-css), Elementor’s site migration guide, Elementor GitHub issues #6764, #18564 and #19017, Beaver Builder documentation, Divi Booster and WP-CLI documentation, all checked September 2026. Elementor admin labels vary between versions.